Showing posts with label amateur boatbuilder. Show all posts

Tuesday, January 14, 2020

Follow the Designer's Plans

There are many types of personality that get involved in boatbuilding. We each do it for our own reasons. Most are not qualified to design that boat, so buy a set of plans that comes closest to meeting their needs, from a designer of their choice.

I have a question for you, as an amateur boatbuilder preparing to start a new project or already into it. It is a rhetorical question, so please don't bombard me with responses. The question is this. If you selected your plans from a reputable designer who knows his craft, why are you wandering off the path chosen by the designer and building it differently, why are you changing important aspects of the design?

You may think that the change that you make is of little consequence but can you be sure? You may be placing the whole project at risk, also jeopardizing the time and expense that you invest in it.

I have been working with a client who can serve as example. He is building a dinghy, of stitch-&-glue construction. Simple enough, in fact so simple as to be the simplest form of boatbuilding. He is an engineer and engineers readily admit to the tendency to redesign anything and everything that they can lay their hands on. It is the difference between a tinkerer who must fiddle first before getting on with the job at hand and a person who just gets down and does what is needed without fuss. It is seeking perfection beyond the point of perfection, where it sometimes becomes so complicated that it no longer works.

In this case he has seen the beveled chine details that are commonly used by another designer and has applied them to my design, which uses square edges on the panels. The wheels came off when the bulkheads didn't fit correctly because the hull panels were narrower than they should have been, due to the loss of width to two bevels at each chine. I referred him to my chine details, clearly shown on the drawings. He had not considered that the change would affect the panel widths of the CNC kit that had been supplied to him.

Another issue developed at the same time, in attempting to fit the bulkheads into the hull. As an engineer, he had meticulously measured the bulkhead locations on my construction drawing and attempted to set them up in those positions. But they didn't fit. I referred him to the building instructions, which clearly tell exactly where to place the bulkheads, without measuring from the drawings. He admitted to having not read the instructions and was working only from his measurements from the drawings. The problem is that this was a hand-drawn design from more than 30 years ago, before CAD, and designed from a small cardboard model that I built by trial-and-error then dismantled to measure the panels and transfer them to the drawing. Somewhere in that process the drawn transom angle differs from the boat that results from the hull panels.

I have gone for more than 3 decades not knowing that the transom angle was wrong and many hundreds of boats have been built to the design, with the builders happily following the instructions to build boats slightly different from the drawings but all very much the same as each other. If this builder had read and followed the instructions I may never have realised that the transom was drawn at an incorrect angle on that drawing. The drawing will stay as it is and boats will continue to be built that way, following the instructions.

I drew this design primarily for first time amateurs, with basic woodworking skills and no knowledge of intricate boatbuilding. My advice to that builder was to take off his engineer's hat and to replace it with the amateur boatbuilder's hat.

There are, of course, ways that a builder can modify the boat from what is shown on the drawings. Simple ones like changing a rubrail detail don't need to be cleared with the designer. Speaking larger boats, anything major, like an interior layout redesign or anything structural, should not be changed without first getting agreement from the designer that you can make that change. Something that may appear to you to have little significance may actually have structural, stability or other implications. Extending the stern or increasing the freeboard changes the distances that structural components have to span and may invalidate aspects of the designer's structural calculations.

Most of my larger monohull sailboat designs have the engine located in the middle of the boat, where it has the optimum location for stability, trim and pitching characteristics, with a galley counter built over the engine. Modifying the interior layout has to be done around that engine location because moving that heavy weight will change the trim of the boat.

I had one client who had the unbalanced skeg-mounted rudder modified by a builder who thought that he knew better and said that a balanced rudder would be an improvement. Yes, a balanced spade rudder will give a lighter helm due to reduced loads. But, and it is a very big but, don't place a balanced rudder behind a full skeg or a full keel unless there is a lot of separation between them, to allow the water to close properly behind the skeg or keel and give the rudder clear flow onto its leading edge. The result of this bad modification is a rudder that pushes its leading edge into the water flow to one side of the obstruction when the helm is turned but has it hidden when on centreline. The result is unpredictable rudder response because the flow onto the rudder blade is very disturbed and irregular.
The unbalanced rudder before modification
The rudder and skeg after modification. Don't do this.
Another engineer client added many fancy features to his boat, features that would help a very expert sailor to draw more performance from his boat, as well as some intended to make the boat easier to sail. He is the ultimate tinkerer and the boat looked very impressive when completed. But so many of the changed details just did not work. I had designed for him a boat with relatively simple rig that would be easy and efficient to sail. The boat that he launched was much more complicated and difficult to sail. The extra features have gradually been removed and he is now unmodifying (the spell-checker says that I can't use that word, it clearly doesn't understand) his deck layout to bring it much closer to my design.

Builders of my boats will know that I am very supportive of their projects and am freely available to advise on changes that they may want to make. If they heed my advice we are good. If not, they are responsible for the results themselves. The designer of your boat certainly knows more about the design and what you should be doing with it than you, as the owner or builder. The best option is to work together with the designer to adapt the boat and your needs, rather than your wants, to produce the most suitable boat.

We have a very wide range of designs, covering many styles, materials, aesthetics and capabilities. See them on our main website or our mobile website.

Monday, November 14, 2016

Finishing Tips for a Good Boat

Amateur boatbuilders are able to create boats of remarkable quality, sometimes rivaling the finishes and detailing that comes out of the best of professional boat shops. Having built a few boats myself, I know that I have the experience and the skills to do work that is as good as many professionals, as long as I stick to fairly standard detailing and don't try anything very fancy.

I see work of similar or better standard from other amateurs but I also see some boats that are somewhat "agricultural" in appearance, with very rough finishes. Much of the problem is related to being unaware of, or ignoring, some fairly basic principles that will make a big difference to the finish without adding a lot of work.

It is worthwhile to do as good a finish on your new boat as you possibly can. The extra effort will pay off later in the price that you can get when you want to sell it and also in the level of pride that you will have in your boat when using it and when showing it off to others. You will put in a lot of time and money creating this boat, which may be wasted if your boat is sub-standard. The cost won't be any different if you follow these tips but the standard will improve considerably. So, be good to yourself and do a good job of the build.
Interior of Hout Bay 33 built by Sergey Fedorov in Russia. Note the lack of sharp corners on all of the woodwork, giving a soft appearance and a feeling of quality. 

In no special order, here are some tips to help you to create that high standard of finish.

1) Sand wood rather than coatings.
It is easier to get a smooth finish on wood than on epoxy, paint or varnish. Do yourself a favour and get the wood as smooth as possible before you apply your first coat of anything over it. This will give you a good foundation on which to build a nice standard of finish on the coatings that will come later.

2) Round off all external angles.
Here I am talking of the exposed corners of framing, trims, bulkheads etc., in fact every external angle in the boat.

There are multiple reasons for this. First, it looks much nicer, due to softening the appearance by removing the visual harshness of the sharp corners.

It allows the coatings to adhere better and be of more constant thickness so that they give maximum protection. Paint and epoxy is pulled away from hard edges by surface tension, leaving those edges with minimal cover and protection. Rounding them off allows the coating to spread itself around the corner, for a smoother finish.

It removes the sharp corners that can cause damage to human skin and bone if fallen against at sea, bumped when cleaning bilges or getting items out of lockers. Those sharp corners can also damage hoses, electrical wiring and other items of boat equipment due to constant movement and chafing at sea.

Rounding off the corners of framing like stringers, joinery cleats and trims is most easily done before installing them in the boat. Do so with a router fitted with a 6mm radius corner round bit on all edges that will be exposed on the completed boat. The simplest way to do this is to use a router table, with the router mounted below and the wood run through the cutter on top of the table. For corners of bulkheads, lockers etc. use a 10mm radius corner round bit on a router than can be run along the edge of the plywood.

Don't think that just because an edge is inaccessible it doesn't need to be rounded off. If you want that piece of timber to have long-term resistance to rot then it needs as much protection as you can give it. That means rounding the edges then coating properly with epoxy, even if you will never see it again.
This DS15 was built by Jim Foot in South Africa. This boat has a wet deck, with all spaces under the deck sealed in and never to be seen again. Nevertheless, all corners have been nicely rounded and all wood surfaces are smooth, ready to take the epoxy coatings. This ensures effective protection for the timber and improved durability of the boat, as well as higher resale value.

2) Smooth off all framing
There is no sensible reason to use timber that is rough on any exposed surfaces. Rough surfaces have many little exposed corners, so coatings will run away from those corners, just as they do from edges that haven't been rounded off. You also increase the risk damage to skin, hoses etc. as described above.

You can buy wood that is planed all round, in the sizes that you need them to go into the boat. However, that is the expensive way to build a boat. It is normally cheaper to buy your timber in wider planks then cut them down to size yourself. Buy a table saw to do this job, it is a valuable piece of equipment for a boatbuilding project. Fit a carbide-tipped blade with 40-50 teeth. That will rip the wood quickly and leave surfaces that need minimal or no sanding.

The saw doesn't have to be a big one, costing loads of money and needing lots of space in the workshop. I built the CW975 "Concept Won" using a skill saw mounted under a portable saw table. When not needed I could pack it away while I did other work. At the other extreme, I built the Didi 38 "Black Cat" using a very nice radial arm saw.

For large boat projects it is worthwhile to buy a bench belt sander with 4" wide belt, which will allow you to run framing over the top of it to remove any roughness if needed. It will also allow you to sand smaller items to a nice finish before fitting them into the boat and to fine-tune the ends of smaller pieces of framing that need to meet neatly at intersections. Attention to these smaller details will make a big difference to the professional appearance of your boat.

Don't sand any frame surfaces that will be glued, rather leave those surfaces slightly rough or clean-cut. Sanding will block the pores of the wood, reducing penetration of whatever glue you use, thereby weakening the bond.

3) Take care with fillets.
Take care and time to make your epoxy fillets constant in radius and shape. A fillet that sags is not pretty and is also weaker than one with a smooth curve that feathers out against the two surfaces that it connects. That can sometimes be difficult to achieve because a high density fillet formed with epoxy, cabosil and wood flour cures very hard and is hard to sand. A little too wet a mix and it will sag, whereas too dry a mix drags when you run your filleting tool over it. A low density fillet is easier to sand out imperfections after it has cured. It is not as strong, so must be larger for equal strength. If you have an ugly high density fillet and can't rework it to look better then add a low density fillet over it to hide it.

4) Sand between coats.
Sand your wood surfaces before applying the first coat of epoxy, paint or varnish. After that blow off all dust with compressed air or vacuum it away. If you don't, you will be rolling dust and wood fibres over the surface when you work. They will be set into the coating and stay there, creating bumps and texture on the surface. The only way to remove this will be by sanding the coating before applying the next coat.

Some of the surface fibres of the wood will often stand up when the first coat is applied. Don't ignore this and paint over it, this will require more coats to cover it. Instead, it will need only a light sanding to smooth the texture before applying the next coat.

Sand lightly between coats if more time has passed than the over-coating time recommended by the manufacturer. For epoxy this is normally 12 hours, for paint it varies. It is also worthwhile to do a chemical wipe with acetone or mineral spirits to remove any surface contamination that may have come from skin contact (body oil in the shape of hand prints may be the most common form of inter-layer failure in painting of cars, boats and furniture) or other sources of contamination. A diesel generator running nearby can ruin your paint job due to oils in the exhaust gasses raining down on everything downwind of it.

5) Feather glass edges
If the boat that you are building has glass-taped joints or areas that are reinforced with fibreglass, sand the edges of the glass to a feather edge then apply a final coat of resin to fill the weave and seal any exposed fibres. Fair the glass surfaces where needed with epoxy fairing compound, as well as along all edges. The fairing should be no thicker than needed to fill any hollows, with minimal thickness over the humps. Sand it smooth to make the glass reinforcement disappear into the surface once it has been painted.
This is the chine of the Didi 950 being built by Mike Vermeersch. It has 2 layers of glass tape, which has been sanded to feather edges, faired and sanded smooth.

The finished chine with epoxy primer, ready for paint.

Achieving a great finish on your new boat should be a major goal. You will experience much more pride and pleasure from a boat that looks really nice than one that is very obviously an amateur build due to inferior surfaces. Challenge yourself to work to the highest standard of finish that you can. You will surprise yourself.

To view our designs, go to our main website or our mobile website.

Wednesday, December 30, 2015

Amateur Boatbuilding Coming Alive Again

All things boating have taken a hammering over the past decade, with most people suffering to a greater or lesser extent through the financial woes that flooded the world. Initially, amateur boatbuilding seemed to stay quite strong, while sales of production boats went into a deep slump.

After amateur boatbuilding also started to weaken, it was interesting (but distressing) to observe the progression of the slowing sales around the world. First to go were the industrialised countries, led by USA and UK, then it spread to less developed countries. It is said that when America sneezes the world will catch the cold. When we lived in South Africa we could watch that phenomenon and knew that what was happening financially in USA, whether up or down, was likely to be mimicked in South Africa within a year or two.

The one market that seemed to stay remarkably buoyant was Russia, where amateur boatbuilding seemed to stay strong. Then war and politics stepped in, the Russian economy took a dive and sales of plans to amateurs in Russia also fell.

Boats are not an essential part of life for most people. For some they are transport or a work implement, for others they are a home but for most people their boats are toys, sporting equipment, or somewhere between, certainly not high on the list of essentials when money becomes tight.

Now we seem to be coming out of that slump. The US economy has been showing signs of life for a year or two and that now seems to be filtering down far enough that amateur boatbuilders are again starting new projects. If the normal pattern pertains, the upswing will spread out to the rest of the world as well.

Over the 35 years that I have been designing boats professionally, I have drawn mostly boats that are suitable for amateurs to build. This was not an intentional path in my design career but, in retrospect, was probably the most natural and logical one. My roots are in amateur boatbuilding, when I built a plywood 36ft cruiser/racer in my in-laws' garden, based on a design by Ricus van de Stadt. My own first full design was the CW975 for a 32ft plywood racer/cruiser, which I also built after it won a design competition. The third design that I drew was the steel Pratique 35 cruiser for an amateur-builder friend. Next was the Coquette 39 plywood racer/cruiser commission, also for an amateur. Only after that did I receive my first commission from a professional builder for a production GRP boat.
My own 2nd big boat project, the CW975 "Concept Won", in my garden.
This depth of involvement with amateur boatbuilders and designs has resulted in a long string of commissions for amateur builders, mostly for plywood. My own third build big-boat project, in the form of the radius chine plywood Didi 38 "Black Cat", and my well-publicized voyaging in her, have reinforced that trend. For the past 30 years I have always had at least a year of work waiting in  line. That has now expanded to a 2-year backlog and I have had to turn away new commissions to keep the backlog somewhat manageable.

As the slump deepened, the average size of boats that people chose to build slipped lower, until we were selling only dinghies and trailer-sailers. Now that average size is starting to creep upward again, as builders move back into bigger boats. The most durable design that we have is the Argie 15, which has developed a good following that keeps it going strongly through thick and thin.
Argie 15 built by Andrey Borodikhin in Moscow, Russia.

In trailer-sailers, the little gaffers, in the form of the Cape Cutter 19 and Cape Henry 21, are the ones that keep going. These lapstrake plywood boats are more complicated projects than a simple stitch-&-glue boat but they are just so pretty that they have attracted a good following. They have also proven to be quick in the light stuff and capable in the rough stuff, so they have grown a reputation for being desirable boats. That resulted in the upward expansion of this design range with the Cape May 25.
Beautifully-built Cape Cutter 19, built by Sergio Vianna of Curitiba, Brazil.
Newest in this series, and already generating much interest even before completion of the design, is the Cape Charles 32. Although not yet on our website and pricelist, drawings have already gone out to the first two builders. This one is a coastal and offshore cruiser, with shallow fixed keel and external ballast, whereas the smaller sisters have steel centreplates and internal ballast. We should have a web page for this design in a month or two. Until then, please email me for info on plan price etc.
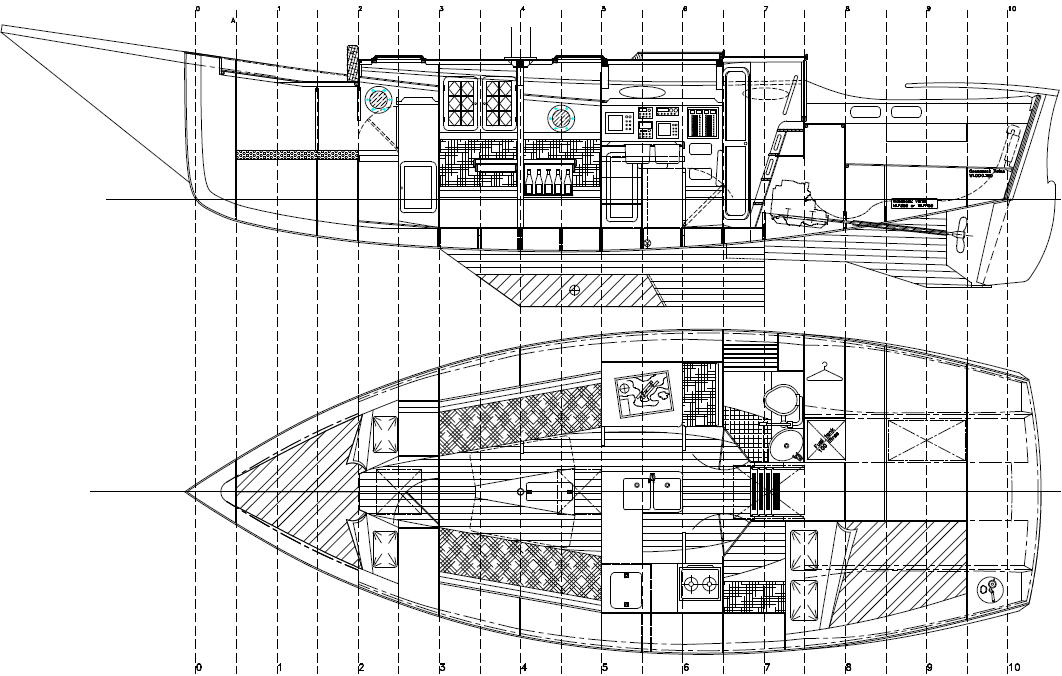
Accommodation layout of Cape Charles 32 cruiser.
It is not only cruisers that are growing in popularity. One of the commissions that is waiting for attention is a bigger sister to the radius chine plywood Didi 950, at 11.4m (37ft). I have also been asked multiple times to draw a Didi concept to the Class 40 Rule but am not able to fit in the design in a reasonable time, so have turned down the commissions. Meanwhile other larger boats in our radius chine plywood range are also starting in various countries. This includes the first in that series, the Didi 38, with two new builds starting in Asia.
Didi 950 radius chine plywood racer/cruiser.
We are also experiencing increased interest in steel cruising designs, which have been very dormant for the past 10 years. Overall, amateur boatbuilding is looking a lot more healthy now than it has for a long time. Now we all need the politicians in all of our countries to play nicely together. If they do that then life should improve for all of us. Lets all go play with our boats.

To see more of these and our many other designs, visit http://dixdesign.com/ or http://dixdesign.com/mobile.

Tuesday, December 29, 2015

Cutting Boatbuilding Costs

I recently had a situation that comes up on a fairly regular basis, often enough to be worthwhile writing about it. It varies but the core message is the same; "Your plans are too expensive, I don't want to pay so much for a few sheets of paper". I end up having to justify the price of my product to someone who is expecting a cheap deal and it has never resulted in a satisfactory closing.

When considering building a boat for yourself, or having one built by a professional, please bear in mind that you want to build a good and safe boat, one of which you will be proud and hope to own for a long time.

~ The plans are not simply a few sheets of paper, the paper is only the medium used to deliver a tremendous amount of information. When the plans are supplied in digital form by email, the negative feeling of the customer may be aggravated because even the paper has disappeared from the package that is supplied. The value of the plans is in the information, not in the paper. You can buy a pile of paper at your local stationers but they cannot sell you the information that you need to build a quality boat.
DS15 sportboat built by amateur Jim Foot in Port Elizabeth, South Africa. Photo Glen Meyburgh.
~ A quality boat design is the result of many, many hours of work, work that has been done by someone who has spent the time, taken the trouble and paid out a lot of money to get the training and experience needed to do a good job of designing that boat. A 40ft boat can take 500 to 1000 hours to draw accurate and high quality detailing. That is what you are paying for in the price of the plans.

~ If you have chosen wisely, you are also buying the accumulated experience and knowledge of someone who has learned, through thousands of miles and decades of boating, what makes a good boat, one that can be built by an amateur, with efficient use of materials, a boat that looks good, moves through the water efficiently and will give you great joy to launch and voyage.

Beautifully-built Cape Henry 21, by Dean Ivancic of Porec, Croatia
~ We all expect to be paid a reasonable wage for our working hours. The person buying the plans expects to be paid for his labour, why would he wish less for any person who is supplying a service to him? If we cannot get a worthwhile price for our work then we must abandon that work and move into another field of employment. I design boats for a living because I love doing so. I retrained myself from another profession that was not as enjoyable but would have given me much higher income. That doesn't make boat design a hobby nor a pastime that needn't pay a satisfactory wage.

~ If you want to pay a low price for a product then you must expect to receive a product of low value. That is the mindset that has resulted in our shops now being overrun with junk products from cheap manufacturers in the East, mostly not worth the price that is paid and not properly fulfilling the purpose for which they were bought. The purchase ends up being a bad investment purely due to hunting a low price.
Didi 38 cruiser/racer built by amateur Stas Pechenkin of Irkutsk, Russia
~ There are places in a boatbuilding project that money can be saved or the dollars can be stretched a bit further. But you have to be judicious in choosing the places to save money. You will be spending a boatload of money to build a large boat and you need that money to be well-spent, a good investment. All of that money will go into buying materials and equipment to go into and onto what is shown on the drawings. The drawings themselves are likely to cost 2-3% of the total cost of the project. If you buy your plans based on price rather than on the quality of the design, you may save yourself 50% of the plan price, which is only 1-1.5% of the total cost. That is a very small saving but it can have a massive effect on the quality and value of the boat that you build. If a particular boat or construction method really appeals to you then you have good reason to buy that design. Changing to another design that doesn't really do what you want but costs less is really not a good reason for the change. Even if you get the plans for free, if they are for the wrong boat then you will be wasting your time and money to even start the project.

~ You can save money on the expensive shiny bits, then upgrade later when more funds are available. It will irreparably harm your boating experience if you build the wrong design but it will be done no harm if you buy good used winches and other hardware at a large saving. Make sure that the used hardware that you buy is to the required specification and in good order, that it has a useful life ahead of it. In a few years, when available funds permit, you can replace with new and sell the used items to another builder who is in a similar position to what you were.
Dix 43 Pilot built by amateur Dennis Wagner of Empangeni, South Africa.
~ Beware though, if you are tempted to buy used that very costly item, the sailing rig. If you find a used rig that you think is suitable for your boat, please first run the dimensions, mast section, rigging diameters and configuration past your designer for advice. A mast that you might think suitable may really be totally unsuitable for your boat for a host of reasons linked primarily to strength, which might cause it to fall down on deck in a tangle of bits. Something else to take into account is that the insurance industry generally applies a service life to the rig and expecting much beyond that may prove to be foolhardy. The service life is generally 5 years for sails, 10 years for rigging and 20 years for spars. If the items that you are considering exceed these ages then they may not be worth buying, should be examined very carefully or maybe even dropped from consideration.

Few people who build their own boats have endless funds. We all want to get the best deals on our purchases. We need to spend judiciously within the limited budgets that we do have available. Part of spending judiciously is to save money where it won't hurt the overall project.